Corel Draw X5 Fit Photo Into a Circle
In this tutorial we will show you how to utilize the PowerClip tool in CorelDRAW for clipping objects, such equally photos, bitmaps and vector objects, and placing them within other objects, text or frames. Using PowerClip is an piece of cake manner to trim your artwork to a specific shape or size or add creative furnishings such as clipping a photograph inside your text.
Cheers for watching! We promise you found this tutorial helpful and nosotros would love to hear your feedback in the Comments section at the bottom of the page. You lot will notice a written version of this tutorial beneath, and a printable PDF re-create and exercise file to download on the Download Resource tab higher up.
See what'southward new in CorelDRAW Graphics Suite!
Download your Complimentary xv-24-hour interval trial for Windows or Mac and fuel your creative burn down with the new perspective tools, flexible pattern space, progressive photo editing tools, and much more than.
Download these free resource:
Written tutorial (PDF, i MB)
Exercise files (Nada file, 6.4 MB)
CorelDRAW Graphics Suite Resources
Quick Start Guide (PDF, 2 MB)
Keyboard Shortcuts (PDF, three.5 MB)
CorelDRAW User Guide (PDF, 28 MB)
Photograph-Pigment User Guide (PDF, 26 MB)
What's New in CorelDRAW Graphics Suite
CorelDRAW Tools
Clipping Objects into Other Objects Using PowerClip
The PowerClip tool in CorelDRAW allows y'all to place vector objects and bitmaps, such as photos, inside other objects, or frames. A frame tin can be any object, for example artistic text or a rectangle. Using PowerClip is an like shooting fish in a barrel way to trim your artwork to a specific shape or size or add together creative furnishings such every bit clipping a photograph inside your text.
Click on any of the images beneath to view full-size.
How to Create a PowerClip Object
Our commencement do is creating a plaid stocking. We have a red stocking and a red plaid pattern. Remember of the stocking as the container that you want to fill with the plaid pattern. There are a few ways of clipping objects, such equally the plaid design into other object, such equally the stocking image.
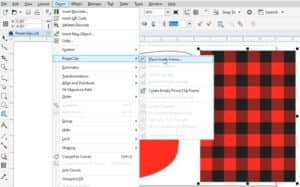
1. Select the plaid pattern and become toObject >PowerClip >Place Inside Frame, or
2. Right-click on the plaid pattern and cullPowerClip Within
Whichever method y'all choose, you will see that your cursor becomes an pointer. Click with the arrow on the stocking and the plaid pattern volition be clipped inside the stocking shape. Then pressCtrl+Z to undo if y'all would like to endeavor the third method.
3. Select the plaid pattern, click and hold your right mouse push and elevate the pattern near halfway into the stocking shape. Your cursor volition become a pocket-size target icon. Release your right mouse button and cullPowerClip Inside from the carte that pops up. The pattern will land in the stocking correct where you let information technology go.

With the first 2 methods, the plaid pattern was automatically centered inside the stocking. But with this 3rd method the pattern is not centered in the stocking. We can make adjustments past editing the PowerClip object.
How to Edit a PowerClip Object
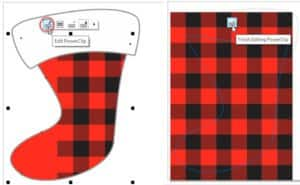
When you select a PowerClip object a small toolbar will appear, normally above or below the object.

This toolbar has options for:
- Edit PowerClip
- Select PowerClip Contents
- Extract Contents
- Lock Contents to PowerClip
- Fit Contents
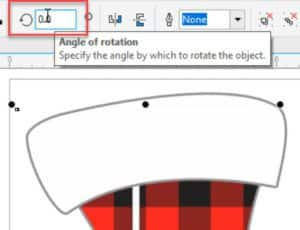
Click on theEdit PowerClip icon and motion the plaid pattern to cover the whole area of the stocking.
One time you lot are inEdit PowerClip mode, you tin can resize or reposition the plaid pattern as you would with whatsoever object, by dragging the nodes inward or outward. If you click on the plaid blueprint a 2d time the nodes will change to arrows, allowing you to rotate the blueprint.
Then click on theFinish Editing PowerClip icon that appears, to exit the PowerClip.
There are a few other means to edit a PowerClip object:
- Select the PowerClip object and go toObject >PowerClip >Edit PowerClip. Edit as needed. To exit, get toObject >PowerClip >Finish Editing PowerClip.
- Hold down theCtrl central and click within the PowerClip object. Edit every bit needed. To exit, hold downwards theCtrl primal and click outside the PowerClip object.
- Right-click on the PowerClip object and selectEdit PowerClip. Edit every bit needed. To exit, right-click again and chooseFinish Editing PowerClip.
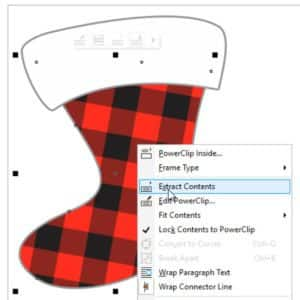
Now that we reviewed how to add and edit PowerClip, let's look at how to extract or remove the contents of a PowerClip container. As with editing a PowerClip object, there are several methods you lot tin choose from.
Select the PowerClip object and then:
- click on theExcerpt Contents icon on the PowerClip toolbar, or
- become toObject >PowerClip >Extract Contents, or
- right-click and chooseExcerpt Contents.
Now elevate the plaid pattern off to the correct. You volition see there is anX inside our previous PowerClip container (stocking). This just indicates that this shape is a PowerClip container.
Note : if you don't want the stocking (or any other object) to exist a PowerClip container anymore, right-click on it and cullFrame Type >None. But to continue with this tutorial, go on it as a PowerClip container.
Additional PowerClip Exercises
Now that you are familiar with the basics of creating and editing PowerClip objects, hither are some additional exercises that will introduce you to avant-garde PowerClip features.
Exercise one: Using the Alt Key
You lot can use theAlt key to edit and move the contents without going inside the PowerClip object. To demonstrate, we will add some white accents to our plaid pattern.
- Select theRectangle tool on theTools toolbar and depict tall sparse rectangle about as tall equally the stocking.
- Switch to theOption tool and click on the white swatch in the Color palette. This volition make the rectangle white.
- Drag the rectangle over the plaid pattern in the stocking but don't release your mouse button. Y'all volition run into a menu that pops up with some instructions, one of which isHold (W) to add to PowerClip frame.
- Press theWest central and then release your mouse button, and the rectangle is added to the PowerClip container.
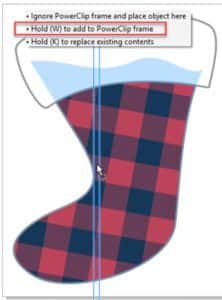
Note: If you have assigned theW key as a shortcut key for another function, the rectangle will still be added to the PowerClip frame but whatever else you have assigned to theDue west key will happen equally well.
- Hold down theALT key and click on the plaid blueprint. See that the nodes (handles) become circles instead of squares. This indicates that you lot are editing within the PowerClip frame.
- If you inverse the angle of the plaid pattern when experimenting with editing PowerClip objects earlier in the tutorial, set theBending of Rotation (in theProperty bar) back to0. This will make it easier to line up the white accents.
- Hold down theAlt key and select the white rectangle. Make certain the nodes are circular to ensure that y'all have it selected.
- Elevate the white rectangle to the middle of one of the plaid rows. Yous tin can also use the nodes to make it thinner if you want.
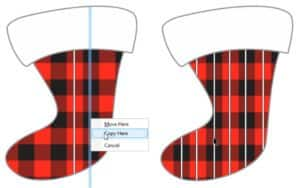
- Concur down your right mouse button and drag the white rectangle left or right to the center of some other plaid row.
- Release your right mouse button and selectCopy Here. Echo this procedure to add together as many white rectangle accents as y'all want.
Practice 2: Using a Photo for a Kitchen Tile Backsplash
Did you lot know that with a process called sublimation you lot tin can impress a photo, graphic design or artwork on ceramic tiles to create a custom backsplash for your kitchen? Here is how to apply the PowerClip tool to set up up the artwork for this project.
In this exercise we will use a backsplash area of 48" wide by eighteen" alpine, and a tile size of 6"x6".
- On page ii of the exercise file, set thePage dimensions to 48" broad x eighteen" alpine in thePropertybar.
- Under theView carte du jour, selectSnap to >Page.
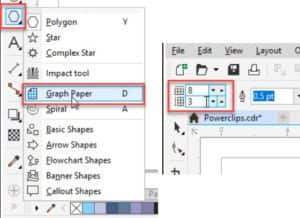
- On theTools toolbar, select theGraph Paper tool in thePolygon tool group flyout. In theProperty bar, prepare the grid size toviiix3.
Drag your mouse from the top left corner to bottom right corner to describe out the graph paper. The result will be a filigree of 24 squares.

- Go toFile >Import and browse to the location where you lot saved the Meadow.jpg photo from the tutorial downloads zero file (or apply any photograph you wish). ClickImport.
- Over again, elevate from the top left corner to bottom right corner to add the photo. Make sure some of the grid is still showing.
- Right-click on the meadow photo and choosePowerClip Within. With the arrow, click on one of the grid lines.

The meadow photo is at present clipped inside the tile grid. Click on theEdit PowerClip icon in the PowerClip toolbar if you need to calibration or move the photo to go far embrace the unabridged grid. Then click on theCease Editing PowerClip icon.
When you are ready to print the tiles, click on theUngroup Objects icon in theProperty bar. At present each of your tiles is a carve up image that tin can be printed.

Do 3: Clipping a Photo Inside Text
You can also use the PowerClip tool for clipping objects inside text. Go to page 3 in the exercise file.
- Right-click on the burn photograph and selectPowerClip Inside.
- With the arrow cursor, click on one of the letters in "Fire Department".
- Click on theEdit PowerClip icon in the PowerClip toolbar, select the fire photograph and apply the nodes to resize and reposition the prototype to fill the text.
- Click on theFinish Editing PowerClip icon and yous're done!

See what's new in CorelDRAW Graphics Suite!
Download your Complimentary fifteen-day trial for Windows or Mac and fuel your artistic fire with the new perspective tools, flexible design space, progressive photograph editing tools, and much more.
carpenterhomplasson.blogspot.com
Source: https://learn.corel.com/tutorials/clipping-objects-into-other-objects-with-powerclip/
0 Response to "Corel Draw X5 Fit Photo Into a Circle"
Postar um comentário